Friday, December 14, 2012

I Love Christmas - Day 5

At this Christmas season, it is so easy to get caught up in all the things of this world.  To keep me grounded, I love to read a portion of the True Christmas Story every morning during my quiet time.

But I have to say I do love all the cute Santa Claus' around....

These will be gift tags on Christmas Jammies....


I stamped the image with StazOn Black and then colored the image.  The first two are colored with Basic Black and Cherry Cobbler Markers.  The first one was cute....but lacking....


So then I added some Dazzling Diamonds...and Santa's beard and fur just pop off the tag...


Then I tried Basic Gray and Real Red along with the Dazzling Diamonds....still cute!  I think I prefer the Cherry Cobbler/Basic Black combination...

Many Blessings - Cathy

Thursday, December 13, 2012

I Love Christmas Week - Day 4

I hope you are enjoying this week as much as I have....

I like to remember my coworkers all through the year.  So today's post is about their gifts...


I found the instructions for these really cute Chrimas trees filled with Hershey's here.


I thought a sentiment was needed and added this really cute one from the More Merry Messages set - such a versatile set!  I've used it many times over.  It was a great purchase!!!

I wish I could gift every person who is faithful at looking at my blog with one of these...but since I've passed 5,000 hits, I'm not sure I could.

So thank you from my heart....

Many Blessings - Cathy

Wednesday, December 12, 2012

I Love Christmas Week - Day 3

At Christmas time, I try and match the gift to the person.  Hence this card....


I am not usually a "Foo-Foo" type girl and this card is all about foo-foo. But it is stunning - don't you think so?  I used Watercolor Winter stamp set.  You can find this beautiful set in the Holiday Catalog...but only through the end of this month. 

This beautiful stamp set is a "two step" stamp set.  That means there are two images to stamp to make the full image.  One is an outline and the other is the solid.  I hand colored the images with my Stampin' Up! markers.  I used Gumball Green and Primrose Petals.

After I stamped the image, I used the Apothecary Accents Framelits to cut it out.  I then layered it on 5 1/2" x 8 1/2" card in Gumball Green.  The Whisper White layer is 5 1/4" x 4".  The striped paper is from the 2012-2014 In-Color Designer Series Paper Pack.  I used the 3/8" Stitched Satin Ribbon in Primrose Petals and wrapped it around the Whisper White.  On top of this I stamped Merry Christmas in Gumball Green and then "flagged" the edges.  To create depth, I folded the ends to create depth.

I truly hope the recipient loves this card as much as I do...

Many Blessings - Cathy

Tuesday, December 11, 2012

I Love Christmas Week - Day 2

It's been very warm here lately but a cold front is coming through with a promise of cooler weather.  And when I say warm - it's been in the mid 70's for the last couple of weeks.  And when I say cooler weather, I talk about highs in the 60's.... Ahhhhh....the glory of winters in Florida!


As Christmas approaches, I'm sure you've been as busy as I have been with shopping for that perfect gift for someone.  As my children get older, it gets hard to shop for them.  So, like so many, I opt out for the all purpose Gift Card! 


And of course, I have to add a little of myself to the gift card by stamping something special.  This set is retired but I love it so much I brought it out again this year!


The Two Tags Die is the perfect accessory for these tags....


Along with my Stampin' Up! Markers and my blending pen.

So as you go about your Christmas shopping, don't forget presentation!

Many Blessings - Cathy


Monday, December 10, 2012

I Love Christmas Week....

I had time this weekend to craft in my room and I've truly enjoyed it!!!  So I have posts for this entire week.  I also plan on time again next week. 
 
I absolutely love Christmas....the Nativity, the children singing, the cooler weather, the lights....and the presents.  But most of all I love being with family.
 
So when Stampin' Up! brought out it's Holiday Catalog and I saw this stamp.... I had to have it!
 

And since I love it so much, I had to pair it with another favorite....polka dots!  This card is the cutest one this season...and it was so easy to put together.  Whisper White cut to 4 1/4" x 11", folded at the 5 1/2" mark.  The polka dot is 4 1/4" x 3".  I stamped It's Christmas in the Heart that Puts Christmas in the Air in the top 2 1/2" and then tied the Gumball Green 3/8" Stitched Satin Ribbon between the two.  I think it is stunning....

So Merry Christmas to You and Yours....

Many Blessings - Cathy

Thursday, November 29, 2012

Scentsational Season - Day #4

Today is Thankful Thursday and I am so blessed!  And I love to share my blessings with other....to include all my blog friends....

Today's inspiration is based upon gift giving at Christmas!


Perfect for all your Christmas Gift Card giving....


Start with the large tag from the Two Tags Die and cut tags out of Cherry Cobbler. Cut matching strips of paper from the Be of Good Cheer designer series paper to decorate the front.


Create a sleeve by cutting a piece of Crumb Cake card stock to 6 1/8" x 4". Score it at 2 7/8" and 6 1/4".  Fold and use sticky strip to close.  If you are using a different size tag, then measure the tag and adding 1/8" of an inch to each side.  Then add an extra 1/4" to the end.


Decorate the front.  I used the Scentsational Seasons stamp set.  The sentiments are from the Tags Til Christmas set and More Merry Messages. I used the Postage Stamp punch, 1 1/2" scalloped square punch, the Modern Label punch, the 1" circle and the new 1 1/4" scalloped circle punch.
 

Insert the Gumball Green 3/8" Stitched Satin Ribbon and tie it of with Cherry Cobbler baker's twine.  Insert your gift card.

More than cute....more than quick....more than appreciated!!!

Many Blessings - Cathy

Wednesday, November 28, 2012

Scentsational Season - Day #3

The days are speeding by...can't believe it's Wednesday already....


At this speed, Christmas is just around the corner...and who has time?  And we all need gift tags...

These were a snap to put together...about 15 minutes total!  I started off with a base of in Real Red and Gumball Green cut with the Apothecary Accents Framelits. Then I cut a simple sheet of Whisper White to fit in the center.  I used the Scentsational Seasons stamp set for each decoration.  Colors are Gumball Green, Daffodil Delight, Early Espresso, and Read Red.  I then cut the shapes out with the Holiday Collection Framelits.  I used Dimensionals to pop them up on one side.  I then used my Crop-A-Dile to punch the hole...and added a it of white ribbon. 

Cute, simple and a real timesaver.

I think the "kids" in the family will love them....

If you like this set, I would recommend you get them before 31 December.  If I can help you with an order, please get in touch with me or order through my on-line Stampin' Up! site. 

Many Blessings - Cathy

Tuesday, November 27, 2012

Scentsational Season - Day #2

Hope you enjoyed the cards from yesterday.  While I was working on the cards, we received a new phone book and on the front of the phone book was a magnetic advertisement....and the juices started flowing...

So out came the Scentsational Season stamp set and favorite ink pads... and then came the Holiday Collection Framelits....and the magnetic advertisement.....and voila!


The magnets are strong enough to go on the fridge or on a piece of sheet metal...


and the backside shows the magnet....

What a cute gift for someone special....like a teacher!

Isn't this just the cutest!!!!

Many Blessings - Cathy

Monday, November 26, 2012

Scentsational Seasons

Thanksgiving was wonderful and I truly enjoyed time spent with family.  I am so blessed!  This year, we each voiced our greatest blessing this past year.  It was an added blessing to hear what God has done for each of us.

It seems there is little time to enjoy Thanksgiving without turning to Christmas...but I truly love the Christmas season - the lights, the sounds, the scents...

So what better way to kick off the season than to explore the Scentsational Season stamp set!


What a cute set!!! and Stampin' Up! makes our lives so much easier through the matching Holiday Collections Framelits.  These cards came together so quick....

I used Crumb Cake cut to 4 1/4" x 11", folded in half.  I then added a strip of Whisper White, embossed with the Perfect Polka Dot folder.  Strips of Be of Good Cheer DSP were "flagged" and added along with a strip of Midnight Navy cardstock.  The sentiment was hand colored with markers and punched with the oval.  A scalloped oval in red was added. 

And what makes each of these easy cards so cute is the Scentsational Seasons tree and mug!

So as you celebrate your holiday seasons, be sure and take time to give Thanks for all that has been given to you....

Many Blessings - Cathy

Wednesday, November 14, 2012

Ornament Week - Day 4 - Instructions!

I have received numerous comments through a variety of sources concerning instructions for making this. 


Instructions can be found at http://www.origami-instructions.com/origami-modular-star-wreath.html.

Happy folding!

Many blessings - Cathy

Monday, November 12, 2012

Whew....

Well - this past weekend, we celebrated Thanksgiving, Christmas and New Years!  I went to visit my Dad and since we won't be together for these holidays, we went through them in fast mode.  It was such fun! 

Needless to say I made it home safe and sound but exhausted.  I've tried to catch up today....and am still behind. I went into my craft room and was working on a project...got out the red line tape....and now I can't find it....hmmmmm...

So I'll try again tomorrow!

Many blessings - Cathy

Friday, November 9, 2012

Ornament Week - Day 5

Today is the final day of ornaments.  I made each of these ornaments to share with my Dad while visiting him.  We are celebrating Thanksgiving on Thursday, Christmas on Friday and New Years on Saturday....since we aren't able to get together for each of these holidays, we'll compress them into the few days we will have together.

So, today we will be celebrating Christmas.  Today's ornament has this as it's central theme.


Once again I used the Ornament Keepsakes stamp set and Real Red to stamp the ornaments.  For this one, I stamped 4 images and then cut them out with the Holiday Ornament Framelits - Stampin' Up! sure does know how to make our life easier....

Snow Flurry snowflakes are cut out of Whisper White and placed in the center of the ornament.  A banner, with "Merry Christmas" stamped in Real Red is bowed and attached with glue dots.  Stunning...

Many Blessings - Cathy

Thursday, November 8, 2012

Ornaments Week - Day 4

Whew...the workweek is over for me this week and I'm headed out to visit my Dad for a few days.  Normally this post is titled Thankful Thursday but I wanted to keep the flow going.  But I have to state I am so thankful for my Dad - he has been such a strong force in my life and I am truly blessed to have him with me.


Isn't this a cute ornament?  I'm so proud to have been able to make this oragami ornament.  I am constantly amazed that someone was able to look at paper, know how to fold it and then join each piece together into this beautiful ornament.

I used Be of Good Cheer designer series paper.  There are 8 squares which are 3" x 3" - only 1/2 a sheet of 12 x 12 paper...not bad.  Intricate fold and join them together.  Add a bit of Real Red ribbon and Voila - it's beautiful!

Many Blessings - Cathy

Wednesday, November 7, 2012

Ornaments Week - Day 3

Middle of the week - hopefully you didn't stay up too late watching the election results. 

Today's ornament is the same shape as the ornament from yesterday but it is a totally different vibe.


This ornament uses the Daydream Medallions stamp set - the same largest and next to largest stamp are used on Real Red and Gumball green in VersaMark and then White Embossing Power is used to provide contrast.  The Floral Frames Framelits is used to cut the three images out.  The smallest image is embossed in white with the "Merry" from the Snowflake Soiree stamp set. To add a little more detail, I used the snowflake image from the Jolly Bingo Bits and stamped with VersaMark. 

Each layer is popped with Dimensionals.  Once again, I set an eyelet (to ensure longevity) and strung it up with 1/8" white ribbon. 

Elegant and fun....

Many Blessings - Cathy

Tuesday, November 6, 2012

Ornaments Week - Day 2

I had time this weekend to play - and what fun it was!!! 


This stunning ornament is so simple.  I used the Daydream Medallions (free for those attending Stampin' Up! Convention 2012).  I used the two largest stamps and used Gumball Green.  I used Cherry Cobbler embossing powder and VersaMark for the red dots.  The Floral Frames Framelits Die (say that fast three times...) were used to but the image out. 

The bird is made using Real Red and the Bird punch.  I punched a second wing and used it as the Cardinal crown.  The eye is the smallest Basic Rhinestone.  I popped the wing and then popped the bird up with Dimensionals. 

A bow is made from 1/8" Taffeta Real Red Ribbon.  I punched a hole at the top and placed an eyelet and ribbon hanger.  This ornament could grace your tree for many years...or lend elegance to any package.

Hopefully, you are enjoying these ornaments as much as I enjoyed making them....

Many Blessings - Cathy

Monday, November 5, 2012

Ornaments Week - Day 1

I had some time over the last couple of days to work on some ornaments.  So this week, I will share them with you....


In order to display them, I hung them on the Card Tree I bought while at Stampin' Up! Convention 2012.  What a great addition to my craft room.

The first ornament I will share with you is my version of the ornament found in the Holiday Catalog.


I used Gumball Green and Cherry Cobbler for the ornaments.  Each ornament is comprised of 5 stamped images, folded in half and glued back to back.  I used the new Scalloped Tulle in Cherry Cobbler.  I laid it out flat and cut segments of three scallops.  I then tucked them in between the Gumball Green ornaments. The center is the new BigShot die Snow Flurry.  I cut the snowflakes out of the Silver Glimmer paper. 

I took my time and did it in steps.  I stamped all the images one night and then cut them out the next.  I assembled it on the third night.  I only have about 1/2 hour each night.

I think they are gorgeous!

Many Blessings - Cathy

Thursday, November 1, 2012

Thankful Thursday

Today I am thankful for folks who go out of their way at work.  I work for a wonderful lady who supervises our co-workers.  She trains, she steps in where needed and she remembers folks when it's time to put them up for awards.
 

In celebration of Boss' Day, I made this sweet card.  She loved it! 

I used a retired stamp set, Love Ya Bunches and colored the image in with various markers.  I then layered it Old Olive.  I then placed in a Whisper White layer embossed with the Fancy Fan Embossing Folder.  I tied Old Olive 1/2" Scalloped Dots Ribbon around the Whisper White before securing it to the card base of Old Olive.

Even if stamps are retired, if you have on you love - USE IT!!!!

Many Blessings - Cathy

Tuesday, October 30, 2012

I'm Back....

I've had some time to replace several projects that I had been working on before my Windows went corrupt.  It seems like forever since I last posted....

Since tomorrow is Halloween, I made little treats for my co-workers. 


I started with the Mini Purse die and used Pumpkin Pie. To create the "basket" instead of the purse, you score 1" along the curved tab and then cut the "bottom" of the purse.  After cutting the "bottom", I then used the Scallop Trim Border Punch to edge the flaps. 

The sides are decorated with "gingham."  I made the gingham by using Pumpkin Pie and the Stripes Embossing Folder.  I inked the folder and ran it through the BigShot.  I then turned it 90 degrees, re-inked the folder and ran it again.  Voila - Gingham!

The handle of the purse was folded in half and nestled inside the basket.  I then took orange tulle and cut a 6" x 12" piece, then folded it in half.  I filled the tulle with M&Ms, gathered it together and used a pipe cleaner as the stem.

The sentiment is from the Holiday Catalog set Monster Munchies stamped with Black StaZon and then punched out with the Scallop Oval Punch.

I hope the co-workers like them... I sure had fun making them!

Many Blessings - Cathy

Tuesday, October 23, 2012

Computer Issues

Well....if you have a computer, it will eventually happen to you....  My Windows got corrupted and I had to start from fresh....  Despite doing a backup, I found that it didn't work.... lost all e-mails and photos from the several months.  So, please be patient while I try and re-accomplish...

Many blessings - Cathy

Thursday, October 18, 2012

Thankful Thursday

Today I am thankful for the interns that I have worked with for the past year.  At my job, we have trainees who rotate to different offices on a yearly basis.  They work hard and learn lots.  This year we have had two that I have worked for. 
 
They are now off to a new office and we will miss them.
 

This card is made for the guy in our office.  I used the ties from Best Dad Ever stamp set and hand colored them in Basic Black.  I stamped on whisper white and layered on basic black, embossed whisper white on a black card.  I used the Lattice Embossing folder - really great texture.

I hope they enjoy their cards... I'll have another post with the feminine card for the other intern.

Many blessings - Cathy

Monday, October 15, 2012

Copy And Steal Everthing (CASE)

There are some days when your mojo is missing....and other days when your mojo is working overtime.  I've had both days in all in the same day.  Take this card - I've loved it from the first!


Who doesn't love elves?  Or Real Red and Old Olive? Isn't the texture from the embossing folder the best?  And I copied it exactly from here.  And then I got to thinking....since it's Halloween time....and the Kidoodles stamp set includes a cutest spider.  So I modified it...


Didn't this turn out cute?

Many blessings.... Cathy

Monday, October 8, 2012

Love the Holidays...

Today we celebrate Christopher Columbus.  There was no parade....nor BBQ...nor special time with family.  Just a quiet day catching up on chores.  Still it was a good day.  I tried to find some time to craft but my nap superseded crafting....

But I do have a card that I made some time ago as a possible choice for the Black and White swap at Convention this year.  I think it is very striking....and oh so simple. Love these.


Supplies for this project:
Paper: Basic Black and Whisper White
Other: Lattice Die, Flower from Itty Bitty Punch Pack, Basic Rhinestones.

Black and white is so classic and the Lattice die is also a classic.  A sentiment could be added for whatever occasion you needed.

Until next time....Many Blessings

Thursday, October 4, 2012

Thankful Thursday

 
Today, I am thankful for the Christmas season.  First and foremost, I am thankful for Jesus.  Because Christmas is all about how God sent his only son to earth in order that we might be restored unto Him.
 
I also love all the beauty of the season....the lights which remind me of the Star that guided the shepherds....the evergreens which remind me of the everlasting love of God....the ornaments that reflect the lights - just as we should reflect the Light within us....
 
Today's offering is a spin from the Holiday Catalog using the Ornament Keepsakes stamp set cut out with the Holiday Ornament Framelits - LOVE these!!!  This ornament also uses the Snow Flurry Bigz Die and a simple banner with Merry Christmas from the More Merry Messages stamp set.


I am also thankful for the new, redesigned Stampin' Up! classic stamp pads.  They make projects like this so much easier.

Until next time, Many Blessings....Cathy

Monday, October 1, 2012

Happy New Year!!!


Sounds funny to be saying that in October but it's the truth!  Every October we start a new work year after working long hours in September.  I am thankful for my job but I don't like end of year workloads and stresses.
 
I didn't have much time, energy or mojo to do crafting in September and I am more than ready to get back to having fun with stamps and paper.


Some days you just don't have a lot of time to put together a card.  So, you should always have a simple, go-to type of card.  Today's example is one such card.  A simple embossing folder, a single stamp, a couple of punches and a little bling - and voila, a really cute wedding card!

I plan on posting more this month than last....I plan on having more time in the craft room! 

Many blessings.... Cathy

Monday, September 24, 2012

Christmas Ornaments

I love the ornaments in the Stampin' Up! Holiday Catalog.  It appears that everyone else also loves them becuase there are many folks who have re-created them.  And so I have officially joined the band wagon.  This week, I will post three that I have made.

The first is a copy of the front page ornament.  It is slightly different in that I didn't have all the supplies...but it still turned out gorgeous!

What do you think?  Leave a comment and let me know....


I used the Ornament Keepsakes and the Holiday Ornaments  Framelits Dies.  I used Gumball Green for the large ornament and Real Red for the smaller ornament.  I'm not a fan of the rosettes so I used the Snow Flurry Bigz Die and the Silver Glimmer paper.  I also used the Scalloped Tulle Ribbon in Cherry Cobbler as a finishing touch and filler.

Really cute!!!

Many Blessings.... Cathy

Thursday, September 20, 2012

Thankful Thursday....

Today I am thankful for Marriage!  I am married to the sweetest man ever and both of my children have wonderful spouses!  My husband and I have been married for over 24 years, our son has been married for almost 7 years and our daughter has been married a little over 1 year.  So blessed!

And every good wedding deserves a hand made card....like today's little jewel.  I started off with the basic card....


I started off with a Real Red card base and layered a Top Note Die cut out of Whisper White.  I then used the Mr & Mrs Stamp Set and stamped the image on Whisper White.  I then used the Apothecary Accents Framelits and the Big Shot to cut the image out.  I then layered it with Real Red cardstock (rectangle) and then used the 1" Circle punch and layered these behind the rectangle.  It appears seamless.  Really cute....but....


It needed some bling!  So I added strips from the Basic Rhinestones.  This is the continuous set of Rhinestones on the top right portion.... It's better....but


A strip of the 5/8" Whisper White Organza ribbon adds an additional element of sophistication and pizazz!.

A great card to share with anyone getting married or even celebrating an anniversary....

I'm so blessed.... Cathy

Tuesday, September 18, 2012

Happy Birthday

It is September....the month with the most birthdays!  In my family, we have 4 birthdays and 1 anniversary.  September is only superseded by February birthdays with a total of 9!  I don't know of anyone who doesn't need a birthday card.


Even though this isn't the best photo, I still believe you get the drift of this colorful card.  The Summer Smooch DSP makes it bright and fun.  The trio of colors and patterns bring movement.  The
greeting is from Perfectly Penned - a great set with a variety of stamps.  And to tie it all together, Daffodil Delight 1/2" Seam Binding ribbon.  All of this set on a base of Island Indigo cardstock.  A quick tip when using darker cardstock - either write with a light colored pen like the White UniBall Gel Pen or even more fun is to use the Silver or Gold Stampin' Dazzle Marker!

Birthday should be fun and your card should be also....

And with September, comes more fun....at work.  This time of year is uber busy with little time to craft or relax or anything else....  so please bear with me as I'm occupied with work.  I will return to posting more faithfully!

Until then - Many Blessings.... Cathy

Thursday, September 13, 2012

A Card for the Birthday Girl....

This week we celebrated our daughter's birthday!  I've made her birthday card every year for almost forever....and this year was no different. 


  Isn't this cute? 


And the inside are presents galore...  It's femine....


It's masculine!!!


With candles galore!!!

My Stampin' Up! Convention roommate, Darlene, sent me an e-mail showing these cards.  Then I had to go on-line to figure out where to make the cuts.  It is 3/4" from the bottom, then 1 1/2" from that first cut, then 1" for the second present and finally 7/8" for the final present.

The stamp on the front is from the Delightful Dozens set and I absolutely LOVE it!  Then for the feminie part, I blinged it up with Basic Rhinestones and ribbon.  For the masculine, I kept the lines simple but added candles to the "cake" on the inside!

The best part is....my daughter LOVED it!!!

Happy Birthday Day!!!

Wednesday, September 12, 2012

So Proud....

Today I am sharing a card I made for my son to celebrate his successful passing of the tests to gain his Commercial Driving License (CDL)!  Not having my CDL, it sounds like the process isn't too easy - a big written test and then the driving portion.  I am so proud of my son!


Isn't this too cute!  The stamp set is retired - Fun on Wheels.  I found this on Ebay and because I have a son and grandson, I thought it would be a great set to add.  It is from Stampin' Up! and is dated 2000.  I searched Stampin' Connection and did not see any samples....so I'm figuring it's pretty rare.  But it was the perfect choice for this card. 

I took three strips of paper, 1 1/2" by 4" and stamped the trucks near the top. Then I took 1/2" strips of black cardstock and used the Signo White Gel Pen and added the stripes.  The Congratulations is stamped on a 1/2" by 4" Whisper White.  All are placed on Real Red.  The fronts of the vehicles is separate from the rear ends....thank goodness for a Stamp-A-Ma-Jig!!!

A great card to celebrate a major accomplishment! 

Monday, September 10, 2012

Monday, Monday....


Monday Monday, so good to me,
Monday Monday, it was all I hoped it would be
 
When I think of Mondays, the song, Monday, Monday by The Mams and The Papas plays in my head.  Of course, it can be the hardest day of the week...trying to get back into the swing of things....try and remember where you ended on Friday....and knowing there are four more days before the weekend...
 
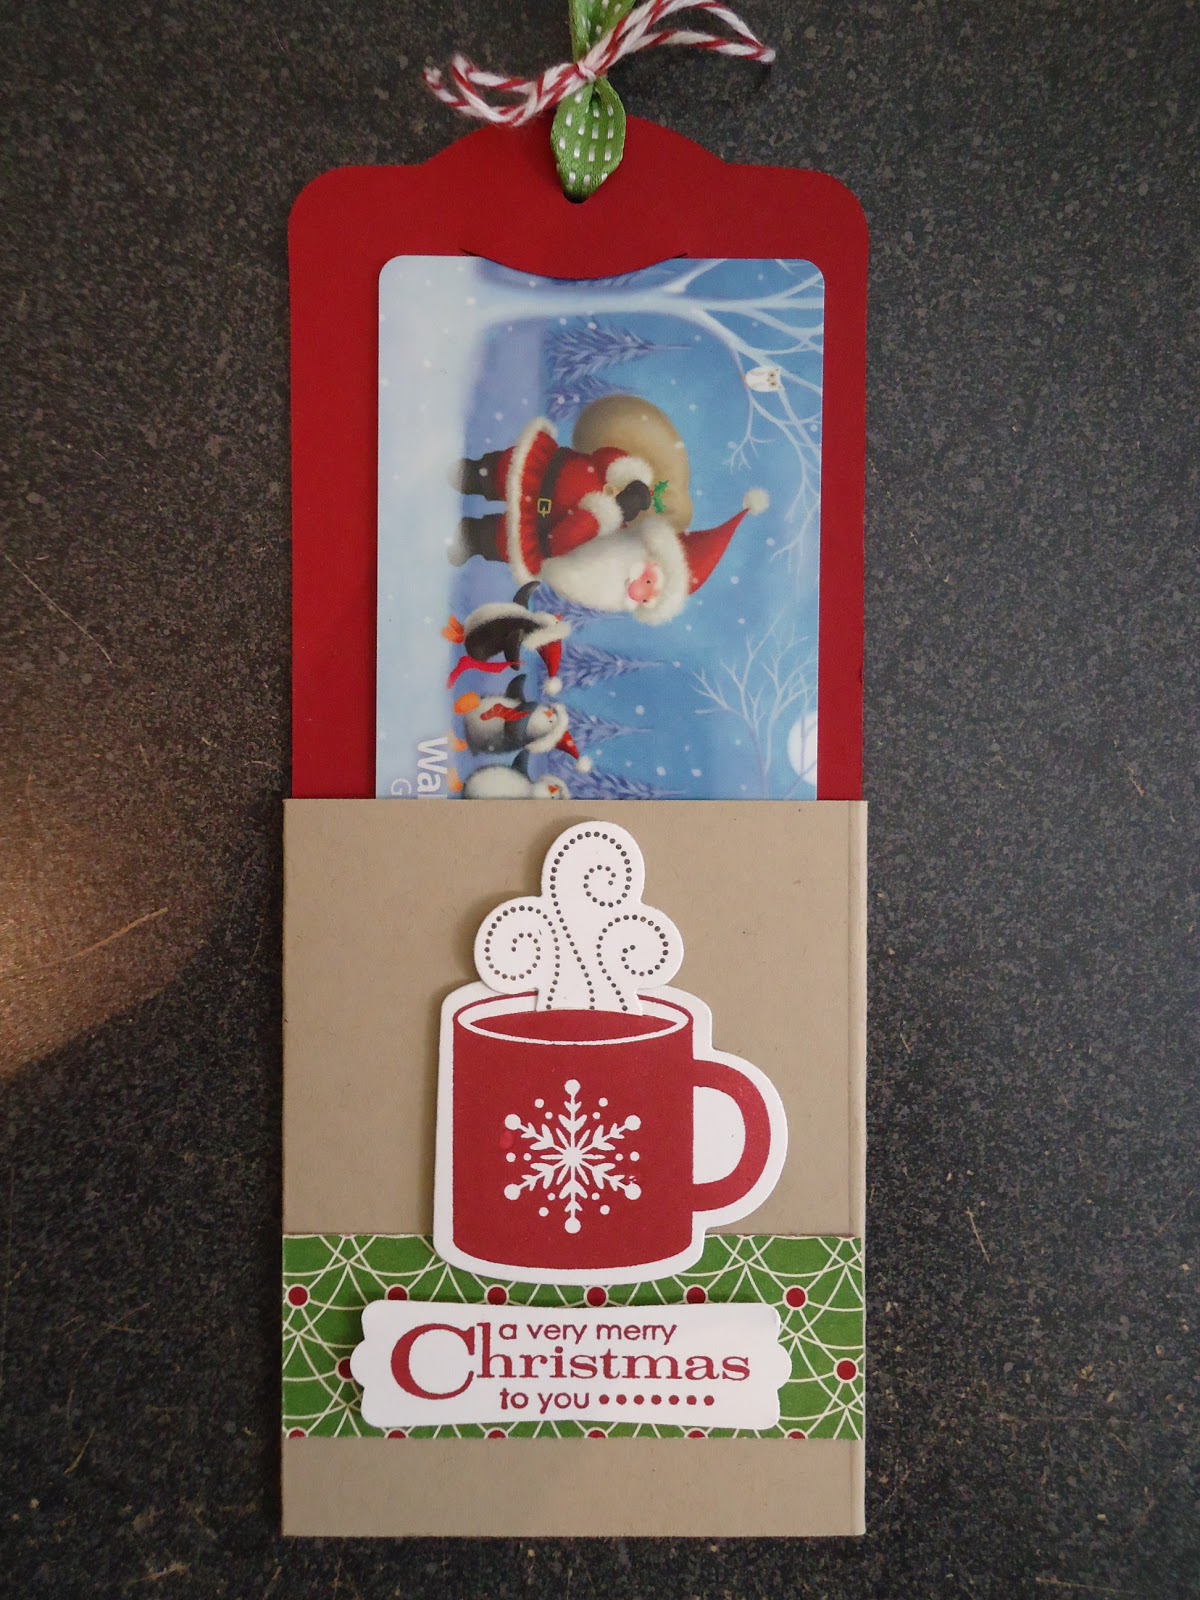
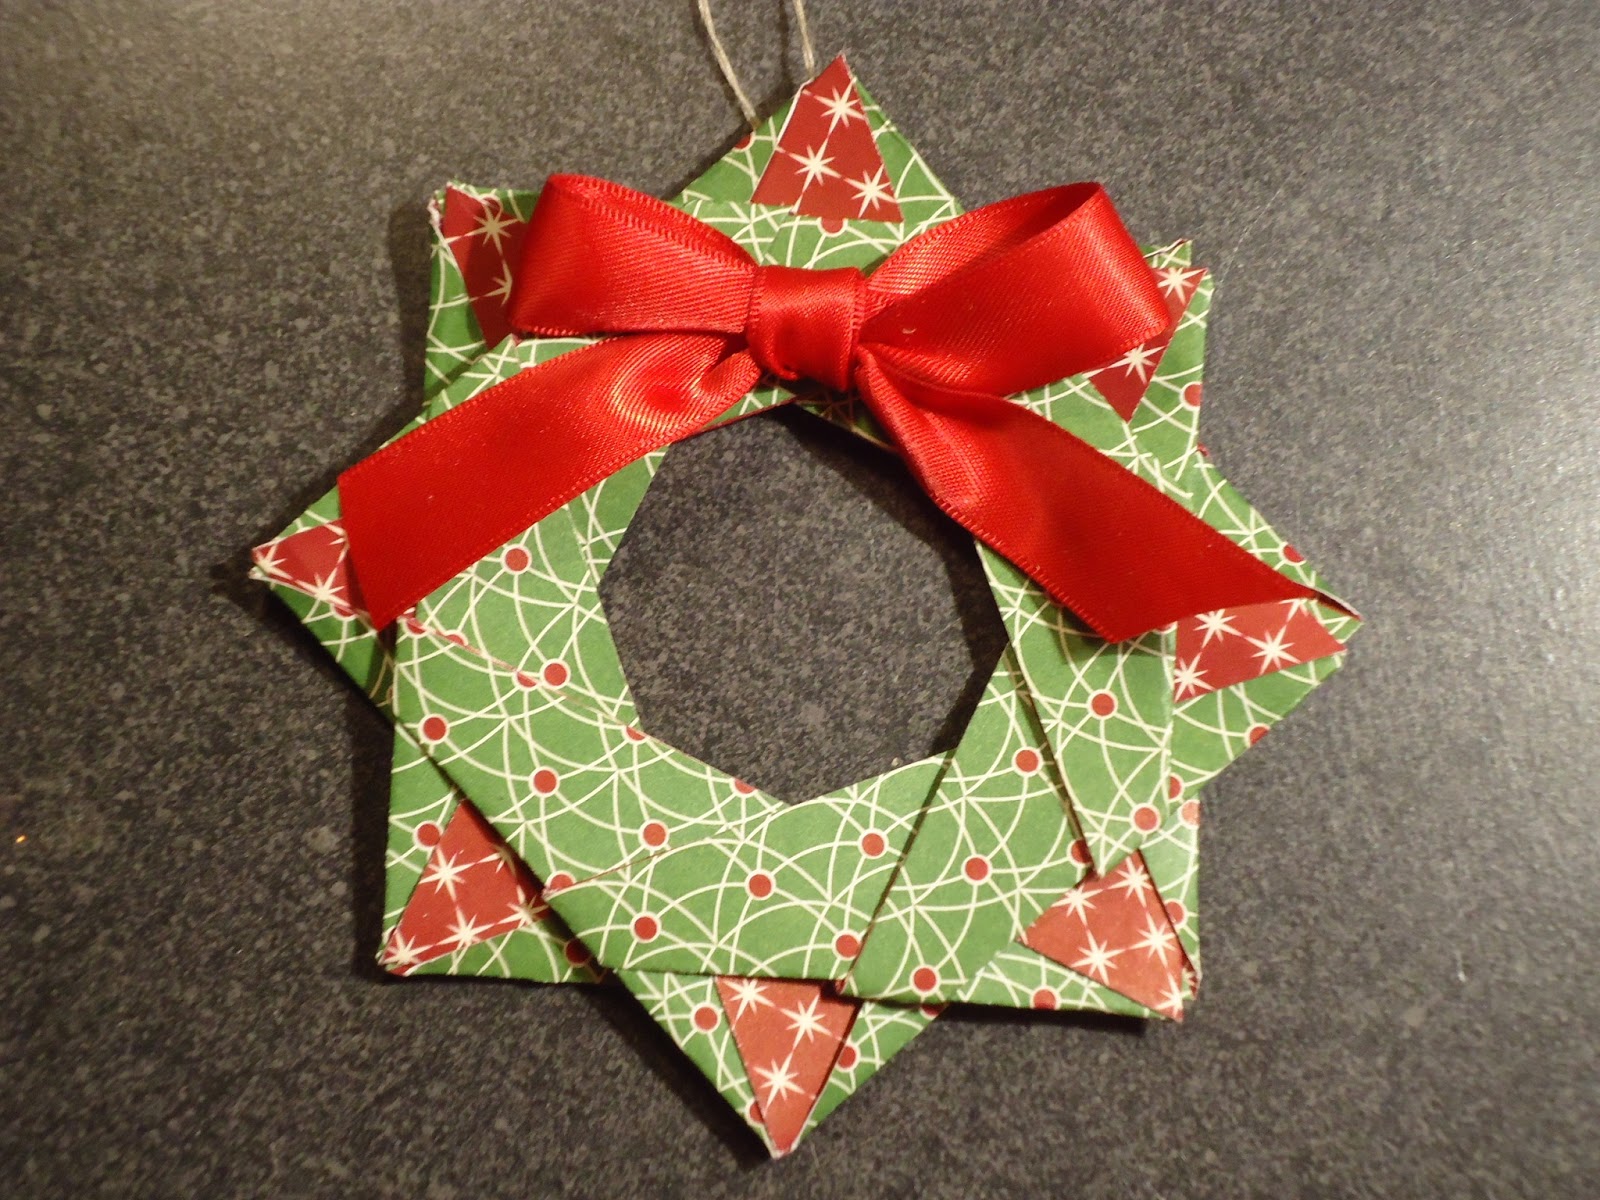
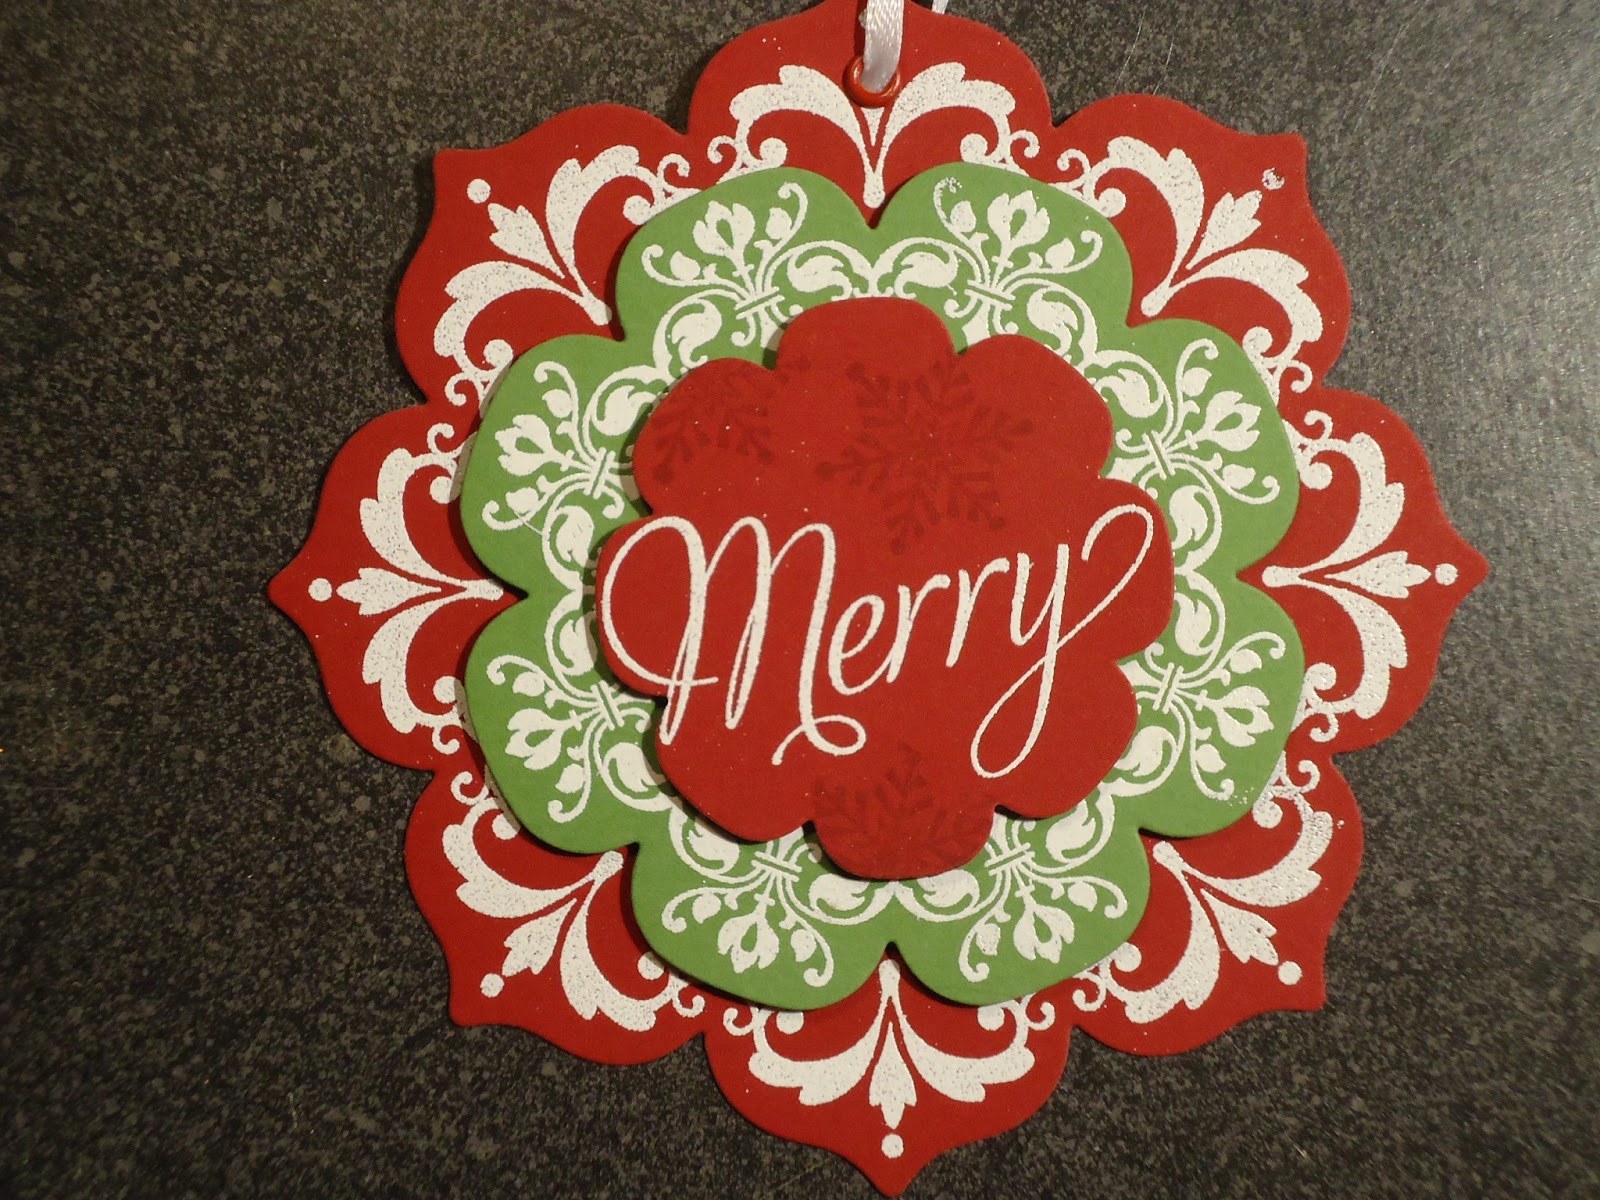
So I try and find something which will brighten my day - and these little treats fit the bill to a "T".  The bright colors, flower shapes and the polka dots make my heart sing!!!!


I found these boxes on Pinterest and followed the links to Beth Beard's website, here.  So what's a girl to do?  CASE them!  The girlfriends and I are getting together to craft a while in a couple of weeks...thought this would be a cute gift for them.  What do you think?  Let me know!

Supplies:
Accessories: Mini Milk Carton Die, Flower Folds Die, Brights and Subtles Buttons, Dimensionals
Paper: Polka Dot Parade, Matching Cardstock, Whisper White

This week I have lots of ideas to share - birthday cards, congratulations cards, Christmas ideas and wedding cards!  I've been busy and am excited to share them!  So check back often.

Of course, as always, if you have any questions, need help in creating these cute ideas or to purchase goodies, let me know and I'll be more than happy to help you out!

Always... Cathy

Thursday, September 6, 2012

Thankful Thursday....

Today I am thankful.....for babies....or better yet - Grandbabies!!!

I am blessed to be "Granny" to a wonderful Grandson and a soon to be beautiful Granddaughter.  We just found out this week it is a "She" instead of a "He"!  I couldn't be more excited.  Of course, I am truly blessed and thankful that this new child will be born to a wonderful father (my son), a wonderful mother (my favorite daughter-in-law) and a wonderful big brother.  Life doesn't get any better than this.

Today's card is made with the sweetest stamp, Two by Two, and colored with markers.


I love this stamp!  I was experimenting and learning on coloring, shading and color choice.  I had stamped the image on Whisper White and then used a blending pen with my stamping ink.  You might not be able to tell, but the liquid from the blending pen was a little too wet for the paper I chose. But that's why we play sometimes - to learn!

Happy Stamping!  And if you need any supplies, just let me know - I'll be more than happy to help you out.  Cathy