Thursday, November 29, 2012

Scentsational Season - Day #4

Today is Thankful Thursday and I am so blessed!  And I love to share my blessings with other....to include all my blog friends....

Today's inspiration is based upon gift giving at Christmas!


Perfect for all your Christmas Gift Card giving....


Start with the large tag from the Two Tags Die and cut tags out of Cherry Cobbler. Cut matching strips of paper from the Be of Good Cheer designer series paper to decorate the front.


Create a sleeve by cutting a piece of Crumb Cake card stock to 6 1/8" x 4". Score it at 2 7/8" and 6 1/4".  Fold and use sticky strip to close.  If you are using a different size tag, then measure the tag and adding 1/8" of an inch to each side.  Then add an extra 1/4" to the end.


Decorate the front.  I used the Scentsational Seasons stamp set.  The sentiments are from the Tags Til Christmas set and More Merry Messages. I used the Postage Stamp punch, 1 1/2" scalloped square punch, the Modern Label punch, the 1" circle and the new 1 1/4" scalloped circle punch.
 

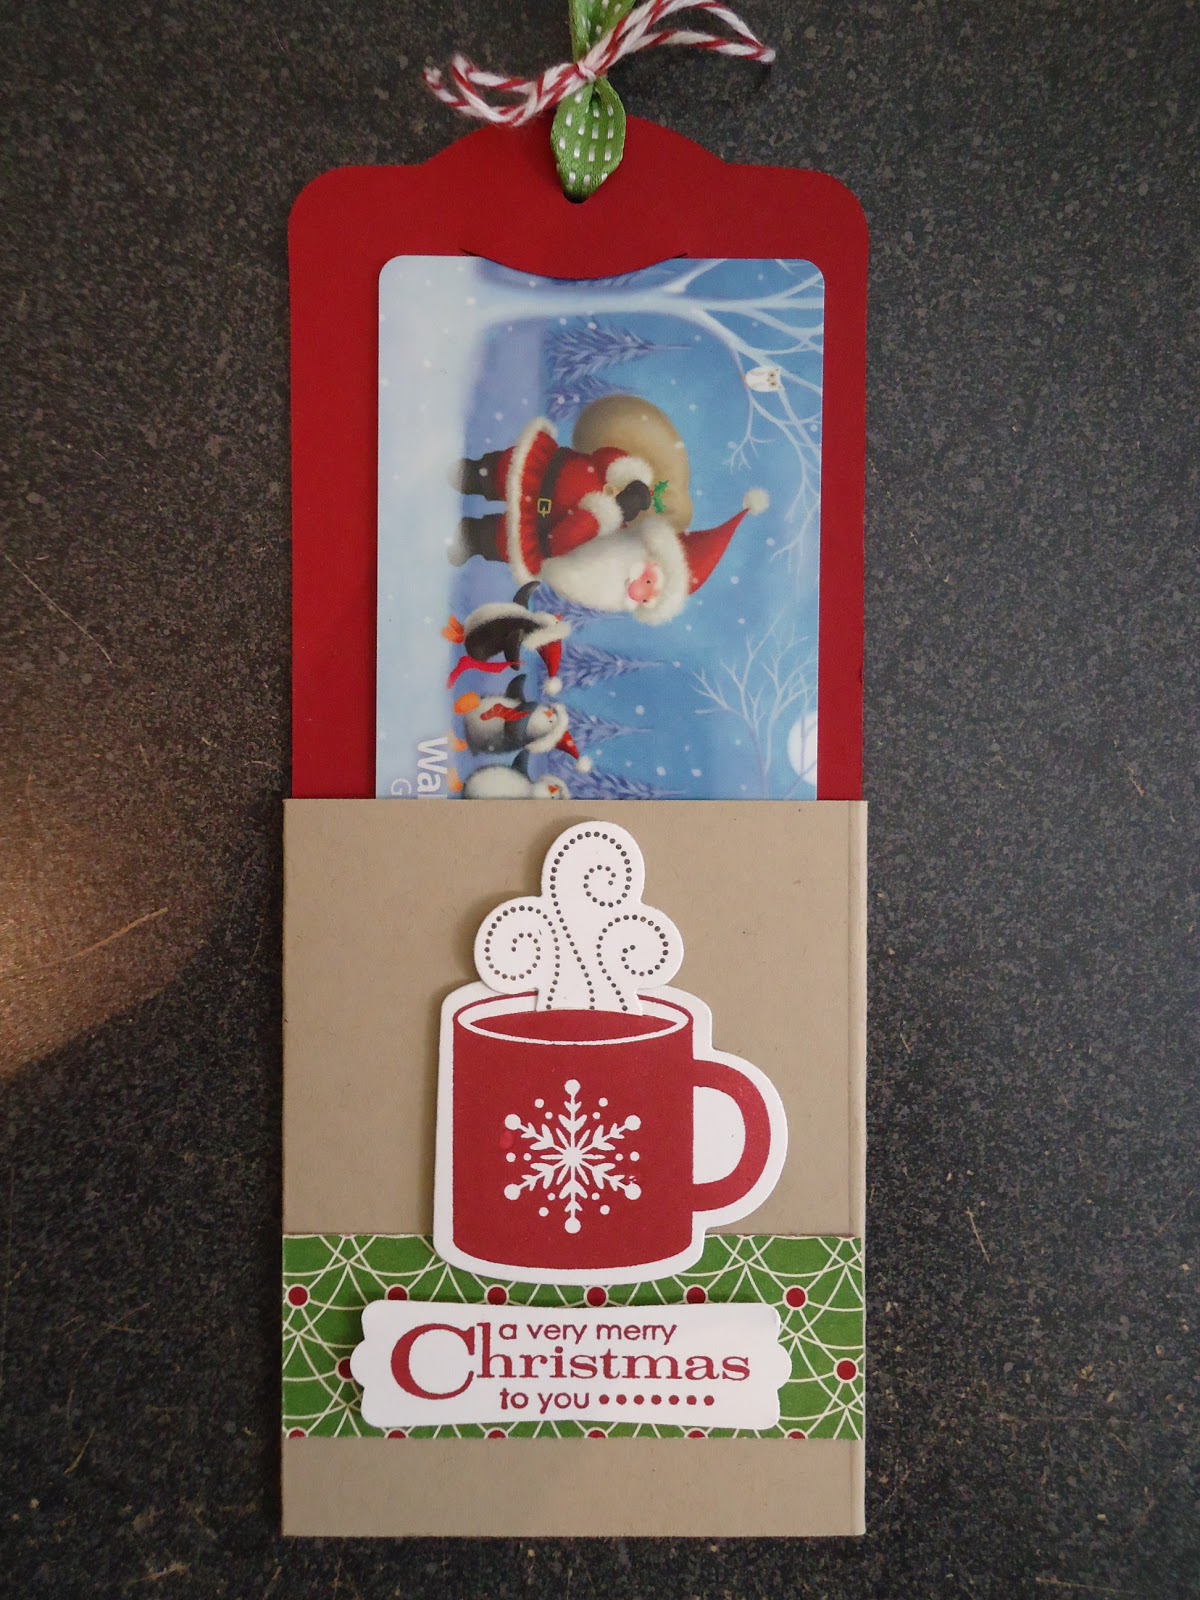
Insert the Gumball Green 3/8" Stitched Satin Ribbon and tie it of with Cherry Cobbler baker's twine.  Insert your gift card.

More than cute....more than quick....more than appreciated!!!

Many Blessings - Cathy

Wednesday, November 28, 2012

Scentsational Season - Day #3

The days are speeding by...can't believe it's Wednesday already....


At this speed, Christmas is just around the corner...and who has time?  And we all need gift tags...

These were a snap to put together...about 15 minutes total!  I started off with a base of in Real Red and Gumball Green cut with the Apothecary Accents Framelits. Then I cut a simple sheet of Whisper White to fit in the center.  I used the Scentsational Seasons stamp set for each decoration.  Colors are Gumball Green, Daffodil Delight, Early Espresso, and Read Red.  I then cut the shapes out with the Holiday Collection Framelits.  I used Dimensionals to pop them up on one side.  I then used my Crop-A-Dile to punch the hole...and added a it of white ribbon. 

Cute, simple and a real timesaver.

I think the "kids" in the family will love them....

If you like this set, I would recommend you get them before 31 December.  If I can help you with an order, please get in touch with me or order through my on-line Stampin' Up! site. 

Many Blessings - Cathy

Tuesday, November 27, 2012

Scentsational Season - Day #2

Hope you enjoyed the cards from yesterday.  While I was working on the cards, we received a new phone book and on the front of the phone book was a magnetic advertisement....and the juices started flowing...

So out came the Scentsational Season stamp set and favorite ink pads... and then came the Holiday Collection Framelits....and the magnetic advertisement.....and voila!


The magnets are strong enough to go on the fridge or on a piece of sheet metal...


and the backside shows the magnet....

What a cute gift for someone special....like a teacher!

Isn't this just the cutest!!!!

Many Blessings - Cathy

Monday, November 26, 2012

Scentsational Seasons

Thanksgiving was wonderful and I truly enjoyed time spent with family.  I am so blessed!  This year, we each voiced our greatest blessing this past year.  It was an added blessing to hear what God has done for each of us.

It seems there is little time to enjoy Thanksgiving without turning to Christmas...but I truly love the Christmas season - the lights, the sounds, the scents...

So what better way to kick off the season than to explore the Scentsational Season stamp set!


What a cute set!!! and Stampin' Up! makes our lives so much easier through the matching Holiday Collections Framelits.  These cards came together so quick....

I used Crumb Cake cut to 4 1/4" x 11", folded in half.  I then added a strip of Whisper White, embossed with the Perfect Polka Dot folder.  Strips of Be of Good Cheer DSP were "flagged" and added along with a strip of Midnight Navy cardstock.  The sentiment was hand colored with markers and punched with the oval.  A scalloped oval in red was added. 

And what makes each of these easy cards so cute is the Scentsational Seasons tree and mug!

So as you celebrate your holiday seasons, be sure and take time to give Thanks for all that has been given to you....

Many Blessings - Cathy

Wednesday, November 14, 2012

Ornament Week - Day 4 - Instructions!

I have received numerous comments through a variety of sources concerning instructions for making this. 


Instructions can be found at http://www.origami-instructions.com/origami-modular-star-wreath.html.

Happy folding!

Many blessings - Cathy

Monday, November 12, 2012

Whew....

Well - this past weekend, we celebrated Thanksgiving, Christmas and New Years!  I went to visit my Dad and since we won't be together for these holidays, we went through them in fast mode.  It was such fun! 

Needless to say I made it home safe and sound but exhausted.  I've tried to catch up today....and am still behind. I went into my craft room and was working on a project...got out the red line tape....and now I can't find it....hmmmmm...

So I'll try again tomorrow!

Many blessings - Cathy

Friday, November 9, 2012

Ornament Week - Day 5

Today is the final day of ornaments.  I made each of these ornaments to share with my Dad while visiting him.  We are celebrating Thanksgiving on Thursday, Christmas on Friday and New Years on Saturday....since we aren't able to get together for each of these holidays, we'll compress them into the few days we will have together.

So, today we will be celebrating Christmas.  Today's ornament has this as it's central theme.


Once again I used the Ornament Keepsakes stamp set and Real Red to stamp the ornaments.  For this one, I stamped 4 images and then cut them out with the Holiday Ornament Framelits - Stampin' Up! sure does know how to make our life easier....

Snow Flurry snowflakes are cut out of Whisper White and placed in the center of the ornament.  A banner, with "Merry Christmas" stamped in Real Red is bowed and attached with glue dots.  Stunning...

Many Blessings - Cathy

Thursday, November 8, 2012

Ornaments Week - Day 4

Whew...the workweek is over for me this week and I'm headed out to visit my Dad for a few days.  Normally this post is titled Thankful Thursday but I wanted to keep the flow going.  But I have to state I am so thankful for my Dad - he has been such a strong force in my life and I am truly blessed to have him with me.


Isn't this a cute ornament?  I'm so proud to have been able to make this oragami ornament.  I am constantly amazed that someone was able to look at paper, know how to fold it and then join each piece together into this beautiful ornament.

I used Be of Good Cheer designer series paper.  There are 8 squares which are 3" x 3" - only 1/2 a sheet of 12 x 12 paper...not bad.  Intricate fold and join them together.  Add a bit of Real Red ribbon and Voila - it's beautiful!

Many Blessings - Cathy

Wednesday, November 7, 2012

Ornaments Week - Day 3

Middle of the week - hopefully you didn't stay up too late watching the election results. 

Today's ornament is the same shape as the ornament from yesterday but it is a totally different vibe.


This ornament uses the Daydream Medallions stamp set - the same largest and next to largest stamp are used on Real Red and Gumball green in VersaMark and then White Embossing Power is used to provide contrast.  The Floral Frames Framelits is used to cut the three images out.  The smallest image is embossed in white with the "Merry" from the Snowflake Soiree stamp set. To add a little more detail, I used the snowflake image from the Jolly Bingo Bits and stamped with VersaMark. 

Each layer is popped with Dimensionals.  Once again, I set an eyelet (to ensure longevity) and strung it up with 1/8" white ribbon. 

Elegant and fun....

Many Blessings - Cathy

Tuesday, November 6, 2012

Ornaments Week - Day 2

I had time this weekend to play - and what fun it was!!! 


This stunning ornament is so simple.  I used the Daydream Medallions (free for those attending Stampin' Up! Convention 2012).  I used the two largest stamps and used Gumball Green.  I used Cherry Cobbler embossing powder and VersaMark for the red dots.  The Floral Frames Framelits Die (say that fast three times...) were used to but the image out. 

The bird is made using Real Red and the Bird punch.  I punched a second wing and used it as the Cardinal crown.  The eye is the smallest Basic Rhinestone.  I popped the wing and then popped the bird up with Dimensionals. 

A bow is made from 1/8" Taffeta Real Red Ribbon.  I punched a hole at the top and placed an eyelet and ribbon hanger.  This ornament could grace your tree for many years...or lend elegance to any package.

Hopefully, you are enjoying these ornaments as much as I enjoyed making them....

Many Blessings - Cathy

Monday, November 5, 2012

Ornaments Week - Day 1

I had some time over the last couple of days to work on some ornaments.  So this week, I will share them with you....


In order to display them, I hung them on the Card Tree I bought while at Stampin' Up! Convention 2012.  What a great addition to my craft room.

The first ornament I will share with you is my version of the ornament found in the Holiday Catalog.


I used Gumball Green and Cherry Cobbler for the ornaments.  Each ornament is comprised of 5 stamped images, folded in half and glued back to back.  I used the new Scalloped Tulle in Cherry Cobbler.  I laid it out flat and cut segments of three scallops.  I then tucked them in between the Gumball Green ornaments. The center is the new BigShot die Snow Flurry.  I cut the snowflakes out of the Silver Glimmer paper. 

I took my time and did it in steps.  I stamped all the images one night and then cut them out the next.  I assembled it on the third night.  I only have about 1/2 hour each night.

I think they are gorgeous!

Many Blessings - Cathy

Thursday, November 1, 2012

Thankful Thursday

Today I am thankful for folks who go out of their way at work.  I work for a wonderful lady who supervises our co-workers.  She trains, she steps in where needed and she remembers folks when it's time to put them up for awards.
 

In celebration of Boss' Day, I made this sweet card.  She loved it! 

I used a retired stamp set, Love Ya Bunches and colored the image in with various markers.  I then layered it Old Olive.  I then placed in a Whisper White layer embossed with the Fancy Fan Embossing Folder.  I tied Old Olive 1/2" Scalloped Dots Ribbon around the Whisper White before securing it to the card base of Old Olive.

Even if stamps are retired, if you have on you love - USE IT!!!!

Many Blessings - Cathy